Creating ASAs in Editor
This guide walks you through creating an ASA in the editor with your own scripts.
Prerequisites
To create an ASA, we'll need
- An Account to sign the
AssetCreateTxn. - An
algodservice that we can use to broadcast the create transaction to the network.
Since we'll be creating the asset in the editor, we'll need to be able to save the account information in the editor. We're going to use ScriptableObjects to store this data.
Tip
See Unity's blog post on ScriptableObjects to learn more about this feature.
Creating the AccountObject
We'll create an AccountObject class that inherits from ScriptableObject. This will store our PrivateKey used for signing.
Important
Do NOT store a sensitive PrivateKey inside your project source. We're only storing the PrivateKey in this demo to keep it simple. In production, you will want to use a secure Algorand wallet to sign your transactions. This SDK currently supports KMD and WalletConnect connections. Please see the Editor Wallet Connection sample to see examples on how to connect your wallets in the editor.
Add the following, AccountObject.cs, to your project:
using System;
using Algorand.Unity;
using UnityEngine;

[CreateAssetMenu]
public class AccountObject
    : ScriptableObject
    , IAccount
    , ISigner
    , ISerializationCallbackReceiver
{
    [SerializeField]
    Mnemonic mnemonic;

    [SerializeField]
    Address address;

    Account account;

    public Address Address => account.Address;

    public SignedTxn<T> SignTxn<T>(T txn)
        where T : ITransaction, IEquatable<T> => account.SignTxn(txn);

    public SignedTxn<T>[] SignTxns<T>(T[] txns, TxnIndices txnsToSign)
        where T : ITransaction, IEquatable<T> => account.SignTxns(txns, txnsToSign);

    void ISerializationCallbackReceiver.OnBeforeSerialize()
    {
        var (privateKey, publicKey) = account;
        address = publicKey;
        mnemonic = privateKey.ToMnemonic();
    }

    void ISerializationCallbackReceiver.OnAfterDeserialize()
    {
        account = new Account(mnemonic.ToPrivateKey());
    }
}
This script wraps the Account class into a ScriptableObject that we can use to store its data in the editor. We use a Mnemonic to store the PrivateKey because it's serializable by the Unity Editor. After the AccountObject is deserialized, Unity regenerates the account field from the mnemonic.
Note
The Account struct could have been made serializable in the Unity Editor. However, we have chosen not to make it serializable to avoid storing PrivateKeys in the editor. Do not store PrivateKey or Mnemonic outside of a Wallet that you trust.
Let's go ahead and generate a new account that will be our Creator for our ASA. Right click in the project window and select Create > Account Object.
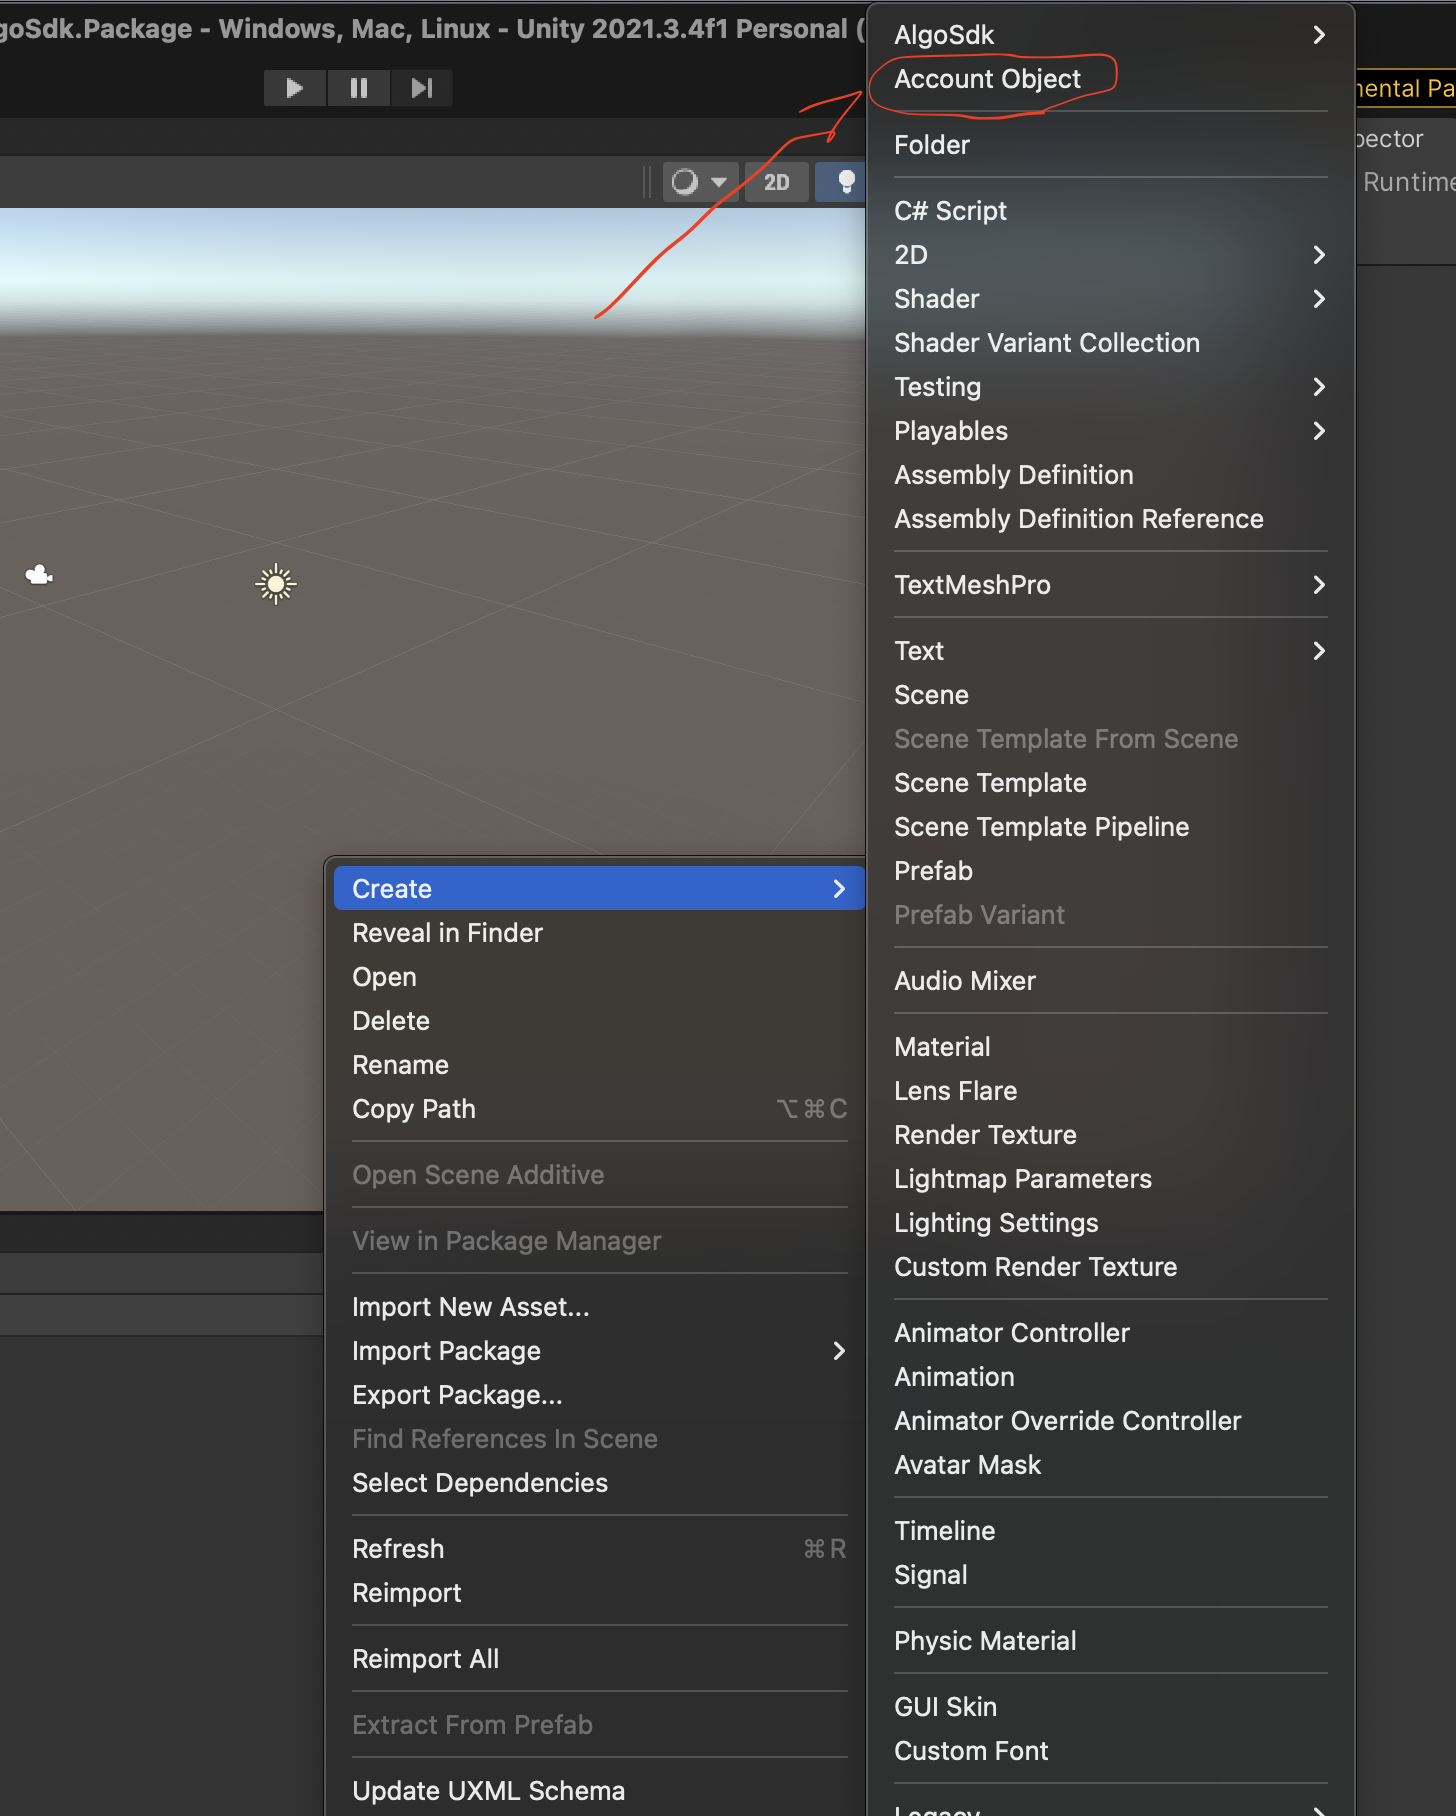
This will create a new asset in your project. Let's name it AssetCreator. It's mnemonic is currently abandon abandon abandon [...] because that is the zero-value PrivateKey. Let's add a method to this object's ContextMenu which should let us generate a new account. Add the following method to the AccountObject.cs script you wrote earlier:
[ContextMenu(nameof(GenerateNewAccount))]
public void GenerateNewAccount()
{
    account = Account.GenerateAccount();
    Debug.Log($"Generated account with address: {account.Address}");
}
This method, when invoked, will generate a new, random account, then it will log the account address to the console. To invoke it in the editor, we've added a [ContextMenu(...)] attribute. Let's go back to our AssetCreator, click on the ... icon to open the context menu, and select GenerateNewAccount.
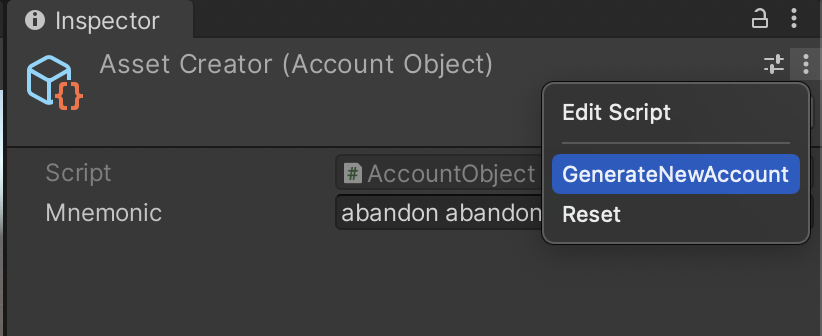
Your mnemonic and address should now be populated in the editor, and you should see a message in your Console window. Great! Now that our account is created, we can fund it in the test net.
- Copy the address in
AssetCreator. - Go to the TestNet Algorand dispenser.
- Paste in your address and select "Dispense".
Your account should now be funded to create Algorand Standard Assets. You can check the status of your account by looking at your account status on a TestNet Algorand Block Explorer.
Creating the AlgodClientObject
Similar to the AccountObject, let's create an AlgodClientObject that inherits from ScriptableObject and stores our client information. Since AlgodClient is already serializable, this is a pretty simple script. Add the following script, AlgodClientObject.cs to your project:
using Algorand.Unity;
using UnityEngine;

[CreateAssetMenu]
public class AlgodClientObject
    : ScriptableObject
{
    public AlgodClient Client;
    public AlgorandNetwork Network;
}
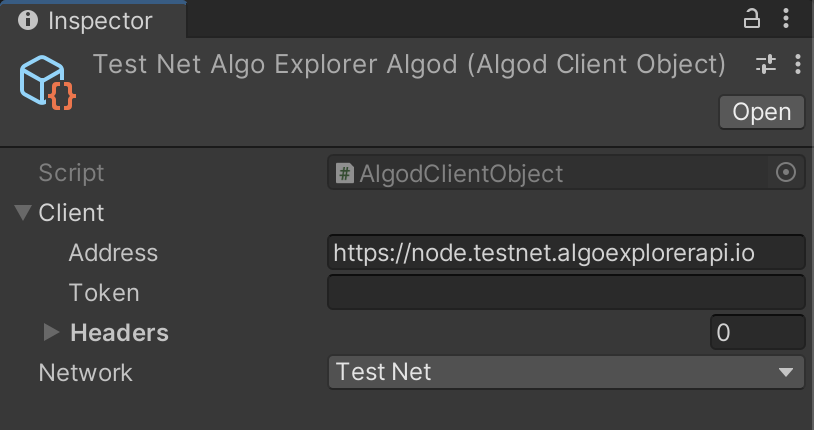
Right click in the project hierarchy, and select Create/Algod Client Object, then name the file TestNetAlgoExplorerAlgod. We're going to use the AlgoExplorer TestNet algod service. This service has most endpoints disabled, but it's free to use and has the transaction endpoints enabled which is good for our usecase. Set the Client/Address field to the AlgoExplorer TestNet algod service address at https://node.testnet.algoexplorerapi.io. Set the Network field to Test Net. It should look like this:
Important
When using an Algorand node in production, it's recommended to consider using multiple nodes or your own node in case of a service outtage. Algo Explorer, while convenient, should not be relied upon by every Dapp.
Creating the Algorand Standard Asset (ASA)
We're not done creating ScriptableObjects just yet. Let's create a ScriptableObject that will store the state of our ASA. Create an AssetObject.cs script and add it to your project:
using Algorand.Unity;
using UnityEngine;

[CreateAssetMenu]
public class AssetObject : ScriptableObject
{
    public AssetIndex Index;
    public AlgorandNetwork Network;
    public AssetParams Params;
}
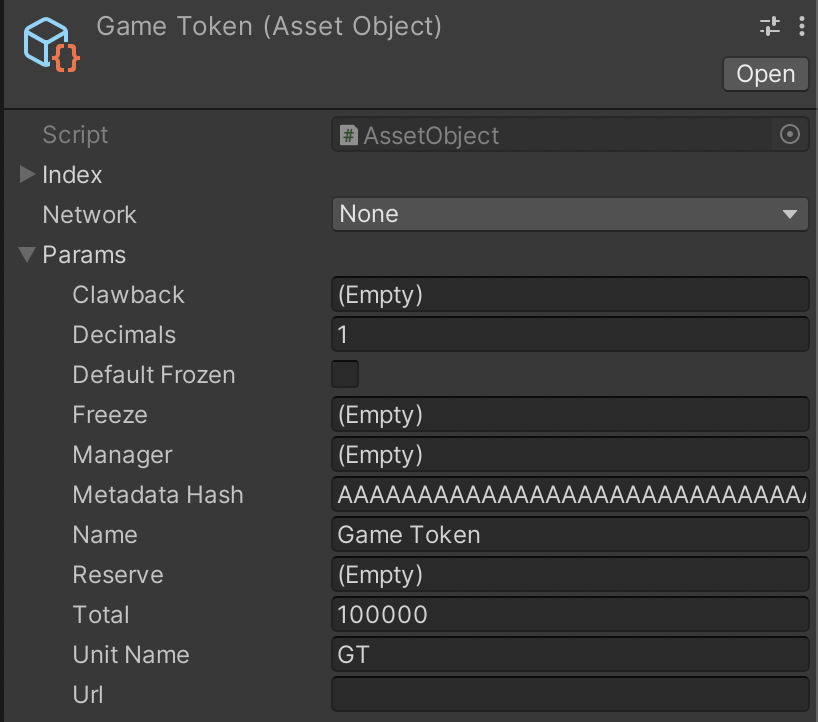
Create an instance of this asset then name it GameToken. You should see a Params field. Expand it, then set the following values for the asset params:
| Parameter | Value |
|---|---|
| Decimals | 1 |
| Name | Game Token |
| Total | 100000 |
| Unit Name | GT |
Your asset should look like this:
Tip
Hovering your mouse over the field labels in the Inspector will show a tooltip that explains what the field is used for. Try it out by hovering your mouse over Clawback.
We've got a ScriptableObject that can be used to store our ASA information, but it hasn't been created on the TestNet yet. Let's add an editor script that will create this ASA on the testnet.
Make a new folder called Editor, and add the following script to it (at Assets/Editor/AssetCreateWindow.cs). Copy the following code into the file:
using System;
using Algorand.Unity;
using Cysharp.Threading.Tasks;
using UnityEditor;
using UnityEditor.UIElements;
using UnityEngine;
using UnityEngine.UIElements;

public class AssetCreateWindow : EditorWindow
{
    [SerializeField]
    AssetObject asset;

    [SerializeField]
    AccountObject creatorAccount;

    [SerializeField]
    AlgodClientObject algod;

    public static void Show(AssetObject asset)
    {
        var window = GetWindow<AssetCreateWindow>("Create ASA");
        window.asset = asset;
    }

    void CreateGUI()
    {
        var root = rootVisualElement;

        var assetField = new PropertyField { bindingPath = nameof(asset) };
        assetField.SetEnabled(false);
        root.Add(assetField);
        root.Add(new PropertyField { bindingPath = nameof(creatorAccount) });
        root.Add(new PropertyField { bindingPath = nameof(algod) });
        root.Add(new Button(CreateAsa) { text = "Create" });

        root.Bind(new SerializedObject(this));
    }

    void CreateAsa()
    {
        Debug.Log("Creating ASA...");
    }
}
This script creates an EditorWindow that we can use to create the asset. We'll use AssetCreateWindow.Show to show the window to the user. The CreateGUI method is there to define the GUI controls in the editor. We have the three fields:
| Field | Description |
|---|---|
asset |
The ASA we want to create. (Read Only) |
creatorAccount |
The account we want to use to create the ASA. |
algod |
The algod service that will broadcast our transaction. |
And we have a Button that will trigger the CreateAsa method when pressed.
Let's add a button to our AssetObject inspector that will show this window if the asset hasn't been created yet. Add another script to the Editor folder, this time AssetObjectEditor.cs:
using UnityEditor;
using UnityEngine;

[CustomEditor(typeof(AssetObject))]
public class AssetObjectEditor : UnityEditor.Editor
{
    public override void OnInspectorGUI()
    {
        base.OnInspectorGUI();

        var assetObject = (AssetObject)serializedObject.targetObject;
        if (assetObject.Index == 0)
        {
            EditorGUILayout.Space();
            if (GUILayout.Button("Create Asset"))
            {
                AssetCreateWindow.Show(assetObject);
            }
        }
    }
}
This script is very simple. It overrides the default inspector, and adds a Create Asset button if the asset has no asset index (i.e. it is not created yet). When the GUILayout.Button is clicked, we show the AssetCreateWindow to the user, passing in the assetObject reference. Try it out! Open your GameToken asset and click the Create Asset button. You should see a new window pop up that shows our previously defined properties. However, when you select Create, the asset isn't actually created. Let's go ahead and implement the CreateAsa method in the AssetCreateWindow.
Since transactions are asynchronous by nature, let's use an async method to handle the asset lifetime. CreateAsa will call this method and let it run in the background while it handles creating the asset:
void CreateAsa()
{
    CreateAsaAsync().Forget();
}

async UniTaskVoid CreateAsaAsync()
{
    if (!asset)
        throw new ArgumentNullException(nameof(asset));
    if (!creatorAccount)
        throw new ArgumentNullException(nameof(creatorAccount));
    if (!algod)
        throw new ArgumentNullException(nameof(algod));

    // check algod health
    var healthResponse = await algod.Client.HealthCheck();
    if (healthResponse.Error)
        throw new Exception($"Algod health check failed: {healthResponse.Error}");

    // get txn params
    var (txnParamsErr, txnParams) = await algod.Client.TransactionParams();
    if (txnParamsErr)
        throw new Exception(txnParamsErr);

    // construct and sign the transaction
    var txn = Transaction.AssetCreate(
        sender: creatorAccount.Address,
        txnParams: txnParams,
        assetParams: asset.Params
    );
    var signedTxn = creatorAccount.SignTxn(txn);

    // send the transaction
    var (submitTxnErr, txnId) = await algod.Client.SendTransaction(signedTxn);
    if (submitTxnErr)
        throw new Exception(submitTxnErr);
    Debug.Log($"Submitted txn with id: {txnId.TxId}");

    // wait for confirmation
    var (txnConfirmErr, confirmedTxn) = await algod.Client.WaitForConfirmation(txnId.TxId);
    if (txnConfirmErr)
        throw new Exception(txnConfirmErr);

    // Apply index and network to the ASA
    var serializedObject = new SerializedObject(asset);
    serializedObject.Update();
    asset.Index = confirmedTxn.AssetIndex.Value;
    asset.Network = algod.Network;
    serializedObject.ApplyModifiedPropertiesWithoutUndo();
    Debug.Log("Asset Created!");

    // close the window now that the asset is created.
    Close();
}
Go ahead and open that window back up by clicking on the Create Asset button. Add your AssetCreator account to the Creator Account field, and add TestNetAlgoExplorerAlgod to the Algod field. Click the Connect button and wait patiently for ~5-6 seconds. TYou should see that the transaction was submitted in the editor console, followed by a confirmation that the asset was created. The window will close automatically, and if you expand the Index field in your GameToken asset, you'll see that it was updated with a number. You can see your asset on the blockchain by searching this asset index on the AlgoExplorer TestNet Block Explorer.